Server
- Restoring Nginx Proxy Manager from Backup
- Backup Guide - Homarr - (OpenMediaVault/Docker)
- 1. ------------ To Do -----------
- General info to sort.
Restoring Nginx Proxy Manager from Backup
This guide walks you through restoring your Nginx Proxy Manager (NPM) Docker container from a backup on an OpenMediaVault system.
🔧 Prerequisites
-
OpenMediaVault system with Docker and Docker Compose installed
-
Backups of the following folders:
-
/srv/dev-disk-by-uuid-2cae64a3-155c-4238-8a9d-99515c6f200f/Muninn/2025backup/nginx-proxy-manager-data -
/srv/dev-disk-by-uuid-2cae64a3-155c-4238-8a9d-99515c6f200f/Muninn/2025backup/nginx-proxy-manager-letsencrypt
-
-
Target restore directory:
-
/srv/dev-disk-by-uuid-b588f7eb-f98f-4e15-b964-25574b92227e/HELCONFIG/nginx/
-
📁 Folder Structure
Ensure the target directory structure looks like this:
/srv/dev-disk-by-uuid-b588f7eb-f98f-4e15-b964-25574b92227e/HELCONFIG/
└── nginx/
    ├── nginx-proxy-manager-data/
    └── nginx-proxy-manager-letsencrypt/
📦 Working Docker Compose File
Place the following docker-compose.yml in the /srv/dev-disk-by-uuid-b588f7eb-f98f-4e15-b964-25574b92227e/HELCONFIG/nginx/ folder:
version: '3'
services:
  nginx-proxy-manager:
    image: jc21/nginx-proxy-manager:latest
    container_name: nginx-proxy-manager
    restart: unless-stopped
    ports:
      - '80:80'
      - '81:81'
      - '443:443'
    volumes:
      - ./nginx-proxy-manager-data:/data
      - ./nginx-proxy-manager-letsencrypt:/etc/letsencrypt
📂 Restore Backups
Use the following commands to copy your backup data into the live configuration folder:
# letsencrypt
sudo cp -a /srv/dev-disk-by-uuid-2cae64a3-155c-4238-8a9d-99515c6f200f/Muninn/2025backup/nginx-proxy-manager-letsencrypt/. \
  /srv/dev-disk-by-uuid-b588f7eb-f98f-4e15-b964-25574b92227e/HELCONFIG/nginx/nginx-proxy-manager-letsencrypt/

# data
sudo cp -a /srv/dev-disk-by-uuid-2cae64a3-155c-4238-8a9d-99515c6f200f/Muninn/2025backup/nginx-proxy-manager-data/. \
  /srv/dev-disk-by-uuid-b588f7eb-f98f-4e15-b964-25574b92227e/HELCONFIG/nginx/nginx-proxy-manager-data/
Ensure trailing /. is used to copy contents only.
🚀 Start Container
Once restored:
cd /srv/dev-disk-by-uuid-b588f7eb-f98f-4e15-b964-25574b92227e/HELCONFIG/nginx/
sudo docker compose up -d
🧪 Troubleshooting
❌ Can't create network
Error: could not find an available, non-overlapping IPv4 address poolFix:
sudo docker network prune❌ Container fails with alias error
Error: network-scoped alias is supported only for user-defined networksFix: Define and use a custom bridge network:
sudo docker network create nginx_networkThen add to docker-compose.yml:
networks:
  default:
    external:
      name: nginx_network
❌ Can't access web interface
-
Check container logs:
sudo docker logs nginx-proxy-manager-
Ensure ports are published correctly (
80,81,443) -
Check firewall / router rules
❌ SSL Renewal Errors
expected .../cert.pem to be a symlinkThese indicate broken or partial LetsEncrypt data. Copy the backup of the letsencrypt folder and ensure correct permissions.
✅ Login Defaults
Once online, access via:
http://[host-IP]:81Default credentials:
Email:    admin@example.com
Password: changeme
📌 Notes
-
Always stop the container before copying data
-
Use
docker compose downif needed before restoring -
Check
database.sqlitetimestamp to confirm restoration
🔁 Optional: Full Refresh
If issues persist, delete the container and volumes, then redeploy and restore the backups fresh:
sudo docker compose down
sudo rm -rf nginx-proxy-manager-data nginx-proxy-manager-letsencrypt
# Then restore backups and re-up
For any further help, ensure Docker is up-to-date and Portainer (if used) is refreshed to reflect changes.
Backup Guide - Homarr - (OpenMediaVault/Docker)
This guide documents how to safely back up your Homarr instance running as a Docker container on OpenMediaVault.
🔧 Purpose
Backing up your Homarr configuration ensures that all your dashboard settings and app tiles can be restored after a system wipe, migration, or rebuild.
🔢 Assumptions
-
Homarr container is deployed via Docker Compose
-
Docker is installed and running
-
Your Homarr folder resides in:
/srv/dev-disk-by-uuid-b588f7eb-f98f-4e15-b964-25574b92227e/HELCONFIG/homarr
- You want to store the backup in:/srv/dev-disk-by-uuid-b588f7eb-f98f-4e15-b964-25574b92227e/HELCONFIG/
---

## 🚀 Backup Process

### ✅ Step 1: Stop the Container
To ensure a consistent backup, stop the running Homarr container first:
```bash
sudo docker stop homarr
✅ Step 2: Install Zip (if needed)
If you haven't used the zip command before, you might need to install it:
sudo apt update
sudo apt install zip -y
✅ Step 3: Create the Backup
Run this command to zip the entire Homarr folder:
sudo zip -r /srv/dev-disk-by-uuid-b588f7eb-f98f-4e15-b964-25574b92227e/HELCONFIG/homarr-full-backup.zip \
  /srv/dev-disk-by-uuid-b588f7eb-f98f-4e15-b964-25574b92227e/HELCONFIG/homarr
⚠️ Ensure you're zipping the entire folder, not just the
appdatadirectory.
✅ Step 4: Start Homarr Again
Once the backup is complete, start your container again:
sudo docker start homarr📁 Result
You will now have a backup file:
homarr-full-backup.zipLocated in:
/srv/dev-disk-by-uuid-b588f7eb-f98f-4e15-b964-25574b92227e/HELCONFIG/This file contains everything inside your Homarr directory.
✉️ Notes
-
The same process can be used to back up other containers by replacing the folder and container name.
-
You can also schedule this with
cronfor automatic backups.
🔄 To Restore
To restore a backup:
sudo unzip homarr-full-backup.zip -d /srv/dev-disk-by-uuid-b588f7eb-f98f-4e15-b964-25574b92227e/HELCONFIG/Then bring the container up with Docker Compose as usual.
1. ------------ To Do -----------
Zip/back up - Radarr, sonarr, sabnzbd, qbittorrent.
Re up - Mesh central
Tidy up Google drive and make room for config backups.
General info to sort.
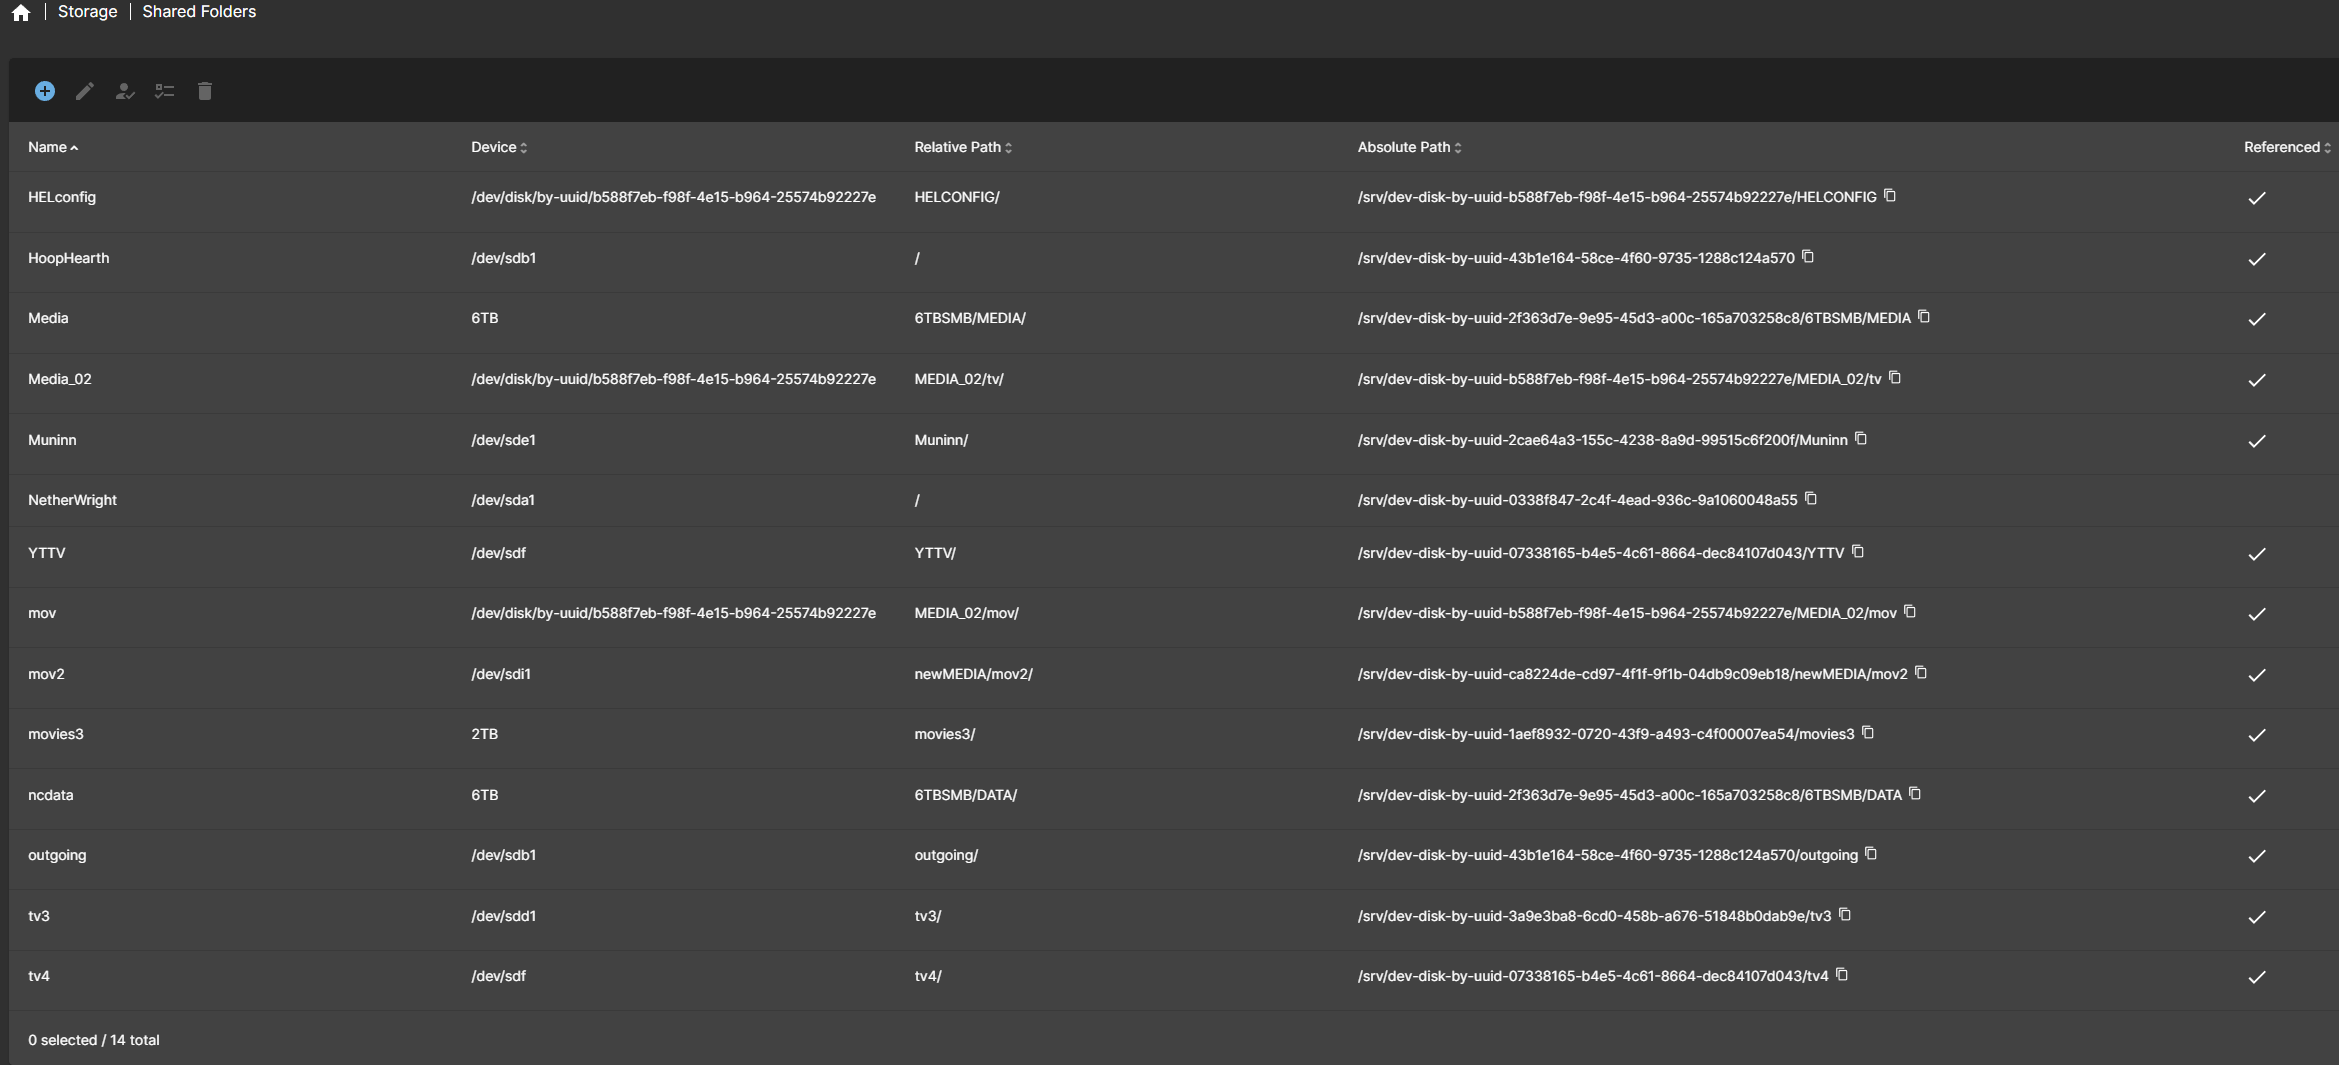
HELconfig -> /srv/dev-disk-by-uuid-b588f7eb-f98f-4e15-b964-25574b92227e/HELCONFIG
HoopHearth -> /srv/dev-disk-by-uuid-43b1e164-58ce-4f60-9735-1288c124a570
Media -> /srv/dev-disk-by-uuid-2f363d7e-9e95-45d3-a00c-165a703258c6/6TBSMB/MEDIA
Media_02 -> /srv/dev-disk-by-uuid-b588f7eb-f98f-4e15-b964-25574b92227e/MEDIA_02/tv
Muninn -> /srv/dev-disk-by-uuid-2cae64a3-155c-4238-a89d-99515c6f200f/Muninn
NetherWright -> /srv/dev-disk-by-uuid-0338f847-2c4f-4ead-936c-9a1060048a55
YTTV -> /srv/dev-disk-by-uuid-07338165-b4e5-4c61-8664-dec841070d43/YTTV
mov -> /srv/dev-disk-by-uuid-b588f7eb-f98f-4e15-b964-25574b92227e/MEDIA_02/mov
mov2 -> /srv/dev-disk-by-uuid-ca8224dc-cd97-4f1f-9f1b-04db9c09eb18/newMEDIA/mov2
movies3 -> /srv/dev-disk-by-uuid-1aef8932-0720-43f9-a493-c4f00007ea54/movies3
ncdata -> /srv/dev-disk-by-uuid-2f363d7e-9e95-45d3-a00c-165a703258c6/6TBSMB/DATA
outgoing -> /srv/dev-disk-by-uuid-43b1e164-58ce-4f60-9735-1288c124a570/outgoing
tv3 -> /srv/dev-disk-by-uuid-3a9e3ba8-6cd0-458b-a676-51848b0dab9e/tv3
tv4 -> /srv/dev-disk-by-uuid-07338165-b4e5-4c61-8664-dec841070d43/tv4