Usefull CMDs
- Linux
- Disk / Space CMD
- Mount network share
- Vault 2 issues with Nginx Proxy not working
- 📂 Sharing a Folder on Debian Linux via Samba
- 📚 Mounting a Network Share for Docker on Debian
- PowerShell / CMD
Linux
Disk / Space CMD
Disk / Space CMD
Will give the usage of the user you are logged in as
sudo du -h --max-depth=1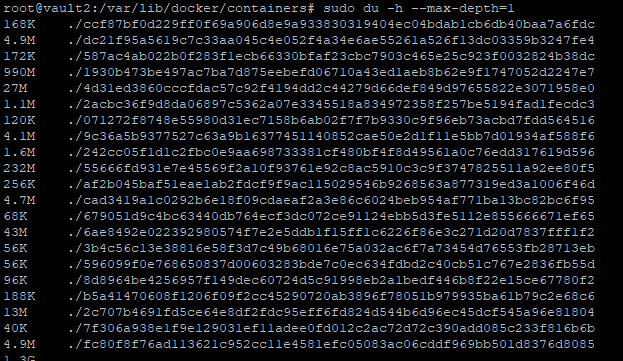
The df command primarily checks disk usage on a mounted filesystem. If you don't include a file name, the output shows the space available on all currently mounted filesystems. Disk space is shown in 1K blocks by default:
df -h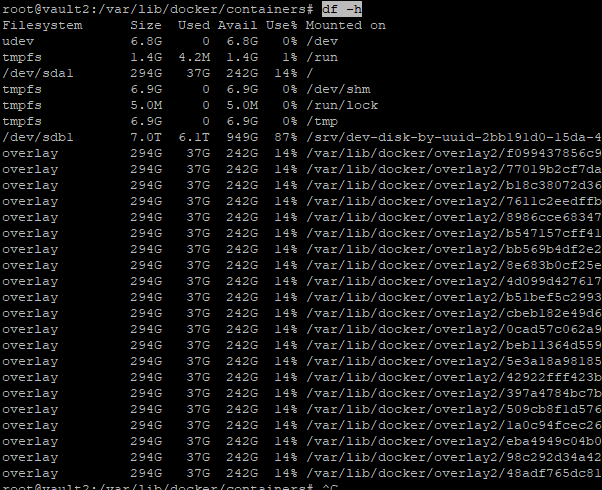
List All Block Devices in Linux
lsblk
lsblk
Mount network share
sudo mount.cifs //192.168.1.252/5tb /5TB -o user=USER,pass=PASSInstall CIFS
sudo apt install cifs-utils mount.cifs //192.168.1.251/hel /mnt/share/NAS/hydra -o user=USER,pass=PASSVault 2 issues with Nginx Proxy not working
Check logs in Portainer - bind port already used (80)
lsof -i tcp:80This will show whats running on that port
fuser -k 80/tcpThis should kill the process, but if not do the below (based on the COMMAND Name)
systemctl stop haproxy📂 Sharing a Folder on Debian Linux via Samba
Last Updated: 2025-06-01
Applies To: Debian 10+, Ubuntu, other Debian-based distributions
Use Case: Share a local folder over the network for access from Windows, macOS, or Linux machines.
🧰 Prerequisites
-
Debian-based Linux system
-
sudoprivileges -
Network connectivity to target devices
🔧 Step 1: Install Samba
Update the system and install Samba:
📁 Step 2: Create a Shared Directory
Choose or create the folder to share. Example:
This creates a public share folder with loose permissions (for anonymous access).
🛠️ Step 3: Configure Samba
Edit the Samba configuration file:
Add the following to the bottom of the file:
📌 Tip:
force user = nobodyensures files are written as thenobodyuser, preventing permission issues.
🔄 Step 4: Restart Samba Services
🔥 Step 5: Open Firewall (If Enabled)
For systems using ufw (Uncomplicated Firewall):
Or manually:
🧪 Step 6: Access the Share
From a Windows or Linux machine:
-
Open File Explorer or file manager.
-
Go to:
\\<your-debian-ip>\PublicShare
You should see the shared folder contents.
🔐 Optional: Secure with Username/Password
To restrict access:
-
Disable guest access:
-
Create a Samba user:
-
Restart Samba:
You’ll now need a username/password to access the share.
🧹 Troubleshooting
| Problem | Fix |
|---|---|
| Can't connect to share | Check firewall, Samba config syntax, and network IPs |
| Files not writable | Check folder permissions and force user setting |
| Authentication issues | Ensure Samba user exists and password is set via smbpasswd |
📎 Related
-
/etc/samba/smb.conf: Samba main configuration file -
sudo testparm: Validates Samba config -
sudo smbstatus: Shows active connections
📚 Mounting a Network Share for Docker on Debian
🧭 Overview
This guide shows how to mount a CIFS/SMB network share on a Debian-based system and use it as a volume in Docker Compose. Useful when your Docker container needs access to shared files hosted on another machine (e.g., a NAS, Windows PC, or another Linux box).
🛠️ Step 1: Install CIFS Utilities
sudo apt update
sudo apt install cifs-utils
📂 Step 2: Create a Mount Point
sudo mkdir -p /mnt/downloads🔐 Step 3: Mount the Share
sudo mount -t cifs //LORGAR/Downloads /mnt/downloads -o username=slitzer,password=blink182,vers=3.0Replace:
//LORGAR/Downloads— with the remote share pathusernameandpassword— with valid credentialsvers=3.0— adjust based on your SMB version (2.0,3.1.1, etc.)
💾 Optional: Persistent Mount via fstab
Edit /etc/fstab:
//LORGAR/Downloads /mnt/downloads cifs username=slitzer,password=blink182,vers=3.0,uid=1000,gid=1000 0 0Using a secure credentials file:
# /root/.smbcredentials
username=slitzer
password=blink182
Then in /etc/fstab:
//LORGAR/Downloads /mnt/downloads cifs credentials=/root/.smbcredentials,vers=3.0,uid=1000,gid=1000 0 0Don't forget: chmod 600 /root/.smbcredentials
🐳 Step 4: Use in Docker Compose
Update your docker-compose.yml:
version: '3'
services:
  myapp:
    image: myapp/image
    volumes:
      - /mnt/downloads:/app/shared
This maps the mounted network share inside the container.
🔍 Troubleshooting
- Check if mounted:
mount | grep downloadsordf -h - Check permissions:
ls -la /mnt/downloads - Logs:
dmesg,journalctl -xe
✅ TL;DR
sudo apt install cifs-utils
sudo mkdir -p /mnt/downloads
sudo mount -t cifs //REMOTE_HOST/Share /mnt/downloads -o username=...,password=...,vers=3.0
Then reference /mnt/downloads in your Docker volumes.
🧠 Pro Tip: Avoid hardcoding passwords by using credential files, especially for systems in production.
PowerShell / CMD
Exchange Powershell CMDs
Step 1: Start PowerShell
Using any of these methods, or any other you may know of:
WinKey + R (Run Dialog): powershell.exe
Step 2: (optional/dependent) Connect to the AD Sync Server
If you're running PowerShell on the Server where AD Connect is running, skip this step.
In the command window run the following command, replacing [SERVERNAME] with the name of the server you need to connect to (you may not be able to do this is PSRemoting is not enabled on the remote server):
Enter-PSSession -ComputerName [SERVERNAME]Step 3: Import the ADSync Module
Run the following command:
Import-Module ADSyncStep 4: Run the Sync Command
Run the following Command(s):
For a Delta Sync (most common, and used for most situations):
Start-ADSyncSyncCycle -PolicyType DeltaFor a Full Sync (only necessary in some situations):
Start-ADSyncSyncCycle -PolicyType InitialStep 5: (Optional/Dependent) Exit PSSession
If you used the Enter-PSSession command, you must exit the session or it will remain open even after terminating the PS Host. You can do so by simply using the command: Exit
Unlock Account
unlock CMD account (codeblue)
NET USER codeblue /ACTIVE:YESCMD - Free Diskspace
Gives free diskspace, change drive letter as needed
powershell -command "(Get-PSDrive C).Free/1GB"